 −50%
−50%
Image Optimizer – Image Optimizer Plugin for WordPress
 −50%
−50%
✦ Key features
- Set JPEG quality from 1 to 100
- Set the big image threshold in pixels
- Huge uploads scaled down automatically
- WebP server support check
- Applies to every new upload
- No outside service
- Photos never leave your server
- One simple settings screen
- Works with any WordPress theme
- Does not need WooCommerce
- No front-end scripts or styles
- Lighter pages for mobile visitors
Overview
Image Optimizer is an image optimizer plugin for WordPress that sets the JPEG quality used on upload, scales down huge photos with a big image threshold, and shows whether your server supports WebP. Everything runs on your own server.
Image Optimizer is an image optimizer plugin for WordPress that makes every new upload lighter, without sending a single file to an outside service. You choose the JPEG quality WordPress uses, you set the size above which huge photos are scaled down, and you see whether your server supports WebP.
It is made for shop owners, bloggers and site managers whose team uploads photos straight from a phone. A product photo from a modern phone can be several megabytes and thousands of pixels wide. That is far more than any screen needs. This plugin puts the two settings that control that weight in your hands.
Who can use Image Optimizer
It works on any WordPress site and with any theme. If you are looking for an image optimizer for WordPress that stays small and private, this is that kind of tool. It does not need WooCommerce or any other plugin. It suits:
- Online shops with many product photos.
- News and blog sites that upload new pictures every day.
- Photographers and portfolio sites.
- Business sites with team photos, banners and galleries.
- Any site where several people upload images and nobody resizes them first.
Why images make a site heavy
Before any setting, it helps to see where the weight comes from.
- Phone cameras save large files, often well above what a web page can show.
- Staff upload quickly and rarely resize first.
- Each upload makes several smaller copies, and each copy uses disk space and bandwidth.
- Product grids and blog archives show many images at once, so small savings add up fast.
Photos are usually the biggest files on a page. A shop homepage full of products multiplies the problem. Visitors on mobile data then wait, and many of them leave.
WordPress already makes smaller copies of each upload for thumbnails and product cards. Two things decide how heavy those copies are. One is the quality number used when it saves a JPEG. The other is the size limit for the largest copy. This plugin gives you control over both.
Back-end options of the image optimizer plugin for WordPress
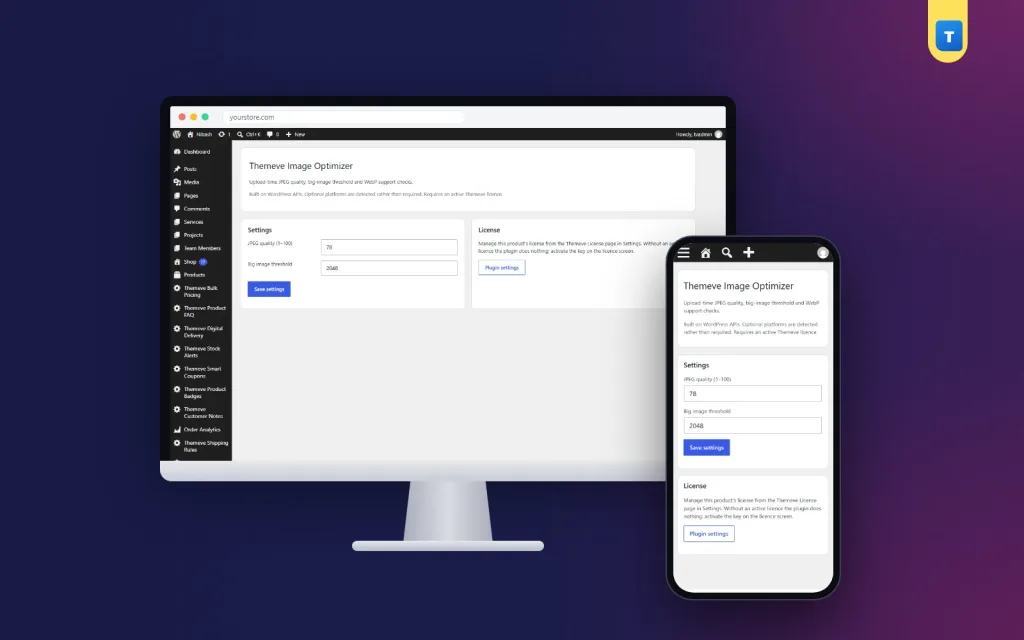
Open Settings › Themeve Image Optimizer. The screen is short on purpose. It has a Settings card and a License card.
JPEG quality (1 to 100)
- A number field that sets the quality WordPress uses when it creates JPEG image sizes.
- The default is 82.
- Higher numbers give larger files and finer detail. Lower numbers give smaller files and slightly softer detail.
- The value is kept between 1 and 100 even if you type something outside that range.
Big image threshold
- A number field that sets the size, in pixels, above which WordPress scales a huge upload down.
- The default is 2560.
- The scaled copy is the one used on your site, so a 5000 pixel photo does not travel to your visitors at full size.
- Set it to 0 if you want to switch the scaling off.
License card
- A link to the licence screen where you activate or check your licence.
- Without an active licence, no setting is applied. Only the lock screen and the licence screen open.
Save settings
One button saves both numbers. The new values apply to every upload from that moment.
How the image optimizer plugin for WordPress works
The plugin uses two standard WordPress hooks: the one that sets JPEG quality, and the one that sets the big image threshold. Your numbers are passed to WordPress, and WordPress does the work with its own image tools. Nothing is installed on the front end, and nothing is uploaded anywhere else.
Set the JPEG quality
For most shop and blog photos, a moderate quality looks the same to visitors and saves a useful amount of space. Try a value. Upload a test photo. Open it on a phone and compare it with the original. If the photo looks soft, raise the number a little. If it looks fine, you may go lower.
Scale down huge uploads
Think about the widest place your theme shows an image. If that is about 1600 pixels, keeping a 5000 pixel copy gives you nothing but weight. Set the threshold close to your widest layout, and the largest copies stay at a useful size.
WebP support check
WebP is a modern image format that is often smaller than JPEG at similar quality. Whether you can use it depends on your server. The plugin shows whether your server supports WebP, so you know what your hosting can do before you plan any change.
What visitors see on the front end
Visitors see nothing new, and that is the point. They see the same pictures, loaded from lighter files. Pages feel faster on mobile data, especially product grids and blog archives with many thumbnails.
Speed and privacy facts
- No front-end script and no front-end style is added.
- No outside compression service is used. Your photos never leave your server.
- No monthly image quota and no external account.
- Only two numbers are stored in your settings.
What it does and does not do
- It works on new uploads, from the moment you save your settings.
- It does not bulk-compress images you uploaded before.
- It does not convert images to WebP. It only shows whether the server supports it.
- It does not touch PNG or GIF files.
For older images, re-upload the most important ones, such as homepage banners and best-seller photos, after you set your preferred quality.
A practical example
A fashion shop's staff upload product photos from their phones. Each file is several megabytes. The owner sets a moderate JPEG quality and a threshold that matches the theme's widest layout. New uploads now produce much lighter copies, and the product grid loads sooner on mobile data. Nobody on the team had to learn a new routine.
Habits that help
Settings do the heavy lifting, but a few habits make them work better. A good image optimizer plugin for WordPress cannot fix a photo that was badly taken, so start with a clean source.
- Crop photos before upload so the product fills the frame.
- Use plain backgrounds, which compress well.
- Name files clearly, such as blue-cotton-panjabi.jpg.
- Keep one photo size standard for the whole team.
Choosing sensible starting numbers
If you do not know where to begin, use these as a guide and adjust after testing.
- Leave quality at the default of 82 for the first week and see how your photos look on a phone.
- Set the threshold close to the widest image your theme displays. Many themes show images no wider than 1600 to 2000 pixels.
- If you run a photography site where detail matters, keep quality higher and the threshold generous.
- If you run a news site with daily uploads and small thumbnails, a lower quality is usually fine.
These are starting points, not rules. Your theme and your audience decide the final numbers.
Check your results
- Before you change anything, note the file size of a typical new product photo in the media library.
- Save your new settings and upload a similar photo.
- Compare the file sizes in the media library.
- Open your homepage on a phone and look at the photos.
- If they look soft, raise the quality by a few points and test again.
Each change is one number, so tuning takes minutes.
Setup steps
- Go to Plugins › Add New › Upload Plugin and choose the plugin zip.
- Click Install Now, then Activate.
- Open My Account on the store where you bought it, copy your licence, and activate it on the plugin's licence screen.
- Open Settings › Themeve Image Optimizer.
- Enter your JPEG quality and your big image threshold.
- Click Save settings.
- Upload a test photo and compare it with the original.
Updates arrive in Dashboard › Updates while your licence is active.
Why choose it over a large image suite
- It is small. There is one settings screen and two numbers.
- There is no outside service, so there is no subscription and no quota.
- It does not change old files, so it cannot damage your existing media library.
- It works with any theme and does not need WooCommerce.
A bigger suite can compress old images in bulk and convert formats. If you need that, choose one. If you want a calm, private way to keep new uploads light, this plugin is the simpler choice.
Pair it with other speed steps
If you want an image optimizer for WordPress to be part of a wider speed plan, treat it as the first step, not the last.
Lighter images are one part of a faster site. Speed Optimizer switches off the emoji and embed scripts and adds lazy loading to images. Site Monitor shows your WordPress version, PHP version, plugins and memory limit on one screen. Each is a separate plugin, so you can add only what you need.
Questions buyers ask before they install
Will my existing media library change?
No. Old files are left alone. Only uploads made after you save the settings use the new numbers.
Can I undo a setting?
Yes. Change the number back and save. New uploads then follow the new value. Files already created keep the quality they were made with.
Does it need WooCommerce?
No. It works on any WordPress site, with or without a shop.
Is my data sent anywhere?
No. The plugin only passes two numbers to WordPress. Your photos stay on your server.
Requirements
- WordPress 6.2 or newer, tested up to WordPress 7.1.
- PHP 7.4 or newer.
- An active licence for this plugin.
What is included
- The plugin zip, ready to upload from Plugins › Add New.
- Your licence, shown in My Account after payment.
- Updates in Dashboard › Updates while the licence is active.
- Documentation after purchase.
- Support for six months through WhatsApp.
Delivery is instant after your payment is checked. Pay with bKash, Nagad or Rocket, enter your Transaction ID, and your download appears in your account. From then on, every new photo your team uploads will be lighter by default. For a small team, an image optimizer plugin for WordPress like this one removes a chore that nobody wants to do by hand.
Image Optimizer is built on the official WordPress documentation standards, and you can browse more of our WordPress plugins.
Reviews
0.0
Write a review
★★★★★
0 reviews from buyersNo reviews yet — be the first to share your experience after buying.
Frequently Asked Questions
01What does an image optimizer plugin for WordPress do?
It controls how heavy your uploaded images become. Image Optimizer sets the JPEG quality and the size above which huge photos are scaled down.
02Is this the right image optimizer plugin for WordPress for my shop?
If you want lighter new uploads without an outside service, yes. It works on any site, with or without WooCommerce.
03Does it compress my old images?
No. It works on new uploads. Re-upload important older images if you want them lighter.
04Does it use an outside compression service?
No. Everything happens on your own server.
05What does the big image threshold do?
Uploads larger than this size in pixels are scaled down, and the scaled copy is used on your site.
06Does it convert images to WebP?
No. It shows whether your server supports WebP, so you know what your hosting can do.
07Which JPEG quality should I choose?
Start with the default of 82, upload a test photo and compare it on a phone. Pick the lowest value that still looks good.
08Does it need a licence?
Yes. Without an active licence no setting is applied, and only the lock and licence screens open.
Delivery & Support
1Place your orderAdd to cart, sign in and pay with bKash, Nagad or Rocket.
2Payment verified automaticallyEnter your Transaction ID — the payment is matched automatically, usually within seconds.
3Get your productYour license key and download appear in My Account → Licenses.
- Secure automatic payment verification
- Delivery to your account & e-mail
- Friendly WhatsApp support
Refund Policy
This policy applies to every product in our store.
You get a refund when the product does not work as described and we cannot fix it, when your license will not activate your website, or when a manually delivered product is late and you cancel before delivery. A working license, or a single license already used on a live domain, is not refundable. Approved refunds go back to the number you paid from within one working day, minus the Send Money charge.
More items
View all →