Choosing the best image optimizer WordPress plugin starts with one question: what is actually making your pages slow? For most sites the answer is photos. A single picture taken on a modern phone can weigh several megabytes, and a shop page can show thirty of them at once.
This guide explains how image weight works, which settings matter, and how to compare tools before you install anything. You will also get a simple checklist, a testing routine and answers to common questions. It is written for shop owners, bloggers and small business teams in Bangladesh who upload photos often and want pages that open quickly on mobile data.
Why images slow down a WordPress site
Photos are usually the largest files on any page. Text, fonts and scripts are small by comparison. When a visitor opens your homepage, the browser must download every image it shows, and on a weak mobile connection that takes time.
Here is where the weight comes from:
- Phone cameras save big files, often 3 to 8 MB each and thousands of pixels wide.
- Staff and writers upload quickly and rarely resize first.
- WordPress makes several smaller copies of each upload, and each copy uses disk space.
- Product grids and blog archives show many images on one screen.
- Sliders and banners often use the largest copy available.
A heavy page costs you in two ways. Visitors wait, and many leave before the page finishes. Your hosting also uses more storage and bandwidth than it needs to.
What an image optimizer actually does
An image optimizer reduces the file size of a picture while keeping it good enough for the screen. It does this in a few ways, and different tools use different ones.
- Lower the quality setting. JPEG files can be saved at different quality levels. A moderate level looks the same to most visitors and is much smaller.
- Resize large originals. A 5000-pixel photo is wasted on a layout that shows it at 1200 pixels.
- Change the format. Formats such as WebP are often smaller than JPEG at similar quality.
- Remove extra data. Some files carry camera information that a web page does not need.
You do not need every method. For many small sites, the first two give most of the gain.
What to look for in the best image optimizer WordPress plugin
Many plugins promise faster sites. Use a short list of questions to separate the useful ones from the noisy ones.
- Does it work automatically? Your team should not need to remember a step on every upload.
- Where do your photos go? Some tools send every file to an outside server. Others work on your own hosting. Decide which you are comfortable with, especially for client or product photos.
- Is the settings screen easy? If the page has forty options, most people will leave the defaults.
- Does it work with your theme? A good plugin should not depend on one theme or page builder.
- Is the cost clear? Watch for monthly fees tied to the number of images.
- Does it slow your admin? A heavy plugin can make uploads and the media library feel slow.
Write down which of these matter most to you, because the best image optimizer WordPress plugin for one site is not the best for another. A busy shop with outside photographers may care about automation. A privacy-minded business may care most about keeping files on its own server.
Check your current image weight first
Before changing anything, measure. Otherwise you will not know whether the change helped.
- Open your homepage and one product or article page in a private browser window.
- Open the browser's developer tools and look at the Network tab, filtered to images.
- Note the total size of images and the biggest single file.
- Run the same pages through a free speed test and write down the load time.
- Test once on your phone using mobile data, not Wi-Fi.
If the biggest single file is over 500 KB on a normal page, you have room to improve. If most images are already under 200 KB, your problem may lie elsewhere, such as hosting or too many plugins.
Set the quality and size settings
Set the right JPEG quality
JPEG quality is a number, usually between 1 and 100. Higher means larger files and finer detail. Lower means smaller files and softer detail.
For most web photos, a middle-high value is a good starting point. Try these steps:
- Pick a value, for example 80.
- Upload a test photo and open the result on a phone and a laptop.
- Compare it with the original. If you cannot see a difference, try a lower number.
- Stop when you first notice blur or blocky edges, then go one step back.
Product photos with fine texture, such as fabric or jewellery, need a little more quality than blog photos. Keep that in mind when you choose one value for the whole site.
Scale down huge uploads
WordPress has a big image threshold. If an upload is wider or taller than that number, WordPress scales it down and uses the smaller copy on your site. Many people never change this setting, and the default may be larger than your design needs.
A simple way to choose the number:
- Find the widest image your theme shows. This is often a full-width banner.
- Add a small margin for sharper screens, but not double.
- Set the threshold near that value. For many themes, 1600 to 2000 pixels is plenty.
There is little point in storing a 5000-pixel copy when the widest slot on your site is 1600 pixels. A sensible limit keeps the largest copies to a useful size.
Check whether your server supports WebP
WebP is a modern image format. It is often smaller than JPEG at similar quality. But your server must be able to create it, and not every hosting plan can.
It helps to know the answer before you plan around WebP. If your server supports it, you can consider the format. If it does not, you can spend your effort on quality and size settings instead. Your hosting provider can also tell you which image libraries are installed.
Fix the upload habit, not only the plugin
A plugin works best when your team also uploads sensible files. A few small rules save a lot of weight.
- Do not upload straight from the camera when a smaller export is easy.
- Crop to the shape you need. A square product photo does not need a wide background.
- Use clear file names, such as red-cotton-panjabi.jpg, not IMG_4521.jpg.
- Use JPEG for photos and PNG only for logos or flat graphics.
- Avoid uploading the same photo several times.
Share this list with anyone who adds content to your site. It takes one minute to read.
Image tips for shops and blogs in Bangladesh
Many visitors in Bangladesh browse on phones with limited data. Your images are the first thing that costs them money and time. Light pages are a kindness to the customer.
- If you sell through Facebook and then send people to your website, check the first page they land on. That page should open in a few seconds on mobile data.
- Keep product grids light. Shoppers compare many items, so each page loads many images.
- For a cash on delivery shop, clear photos reduce returns, so do not lower quality so far that colours or stitching look wrong.
- Test on a mid-range phone, not only on your own laptop.
- Check the page again after you add new banners for Eid or sale seasons, since these tend to be large.
A ready-made option: Image Optimizer
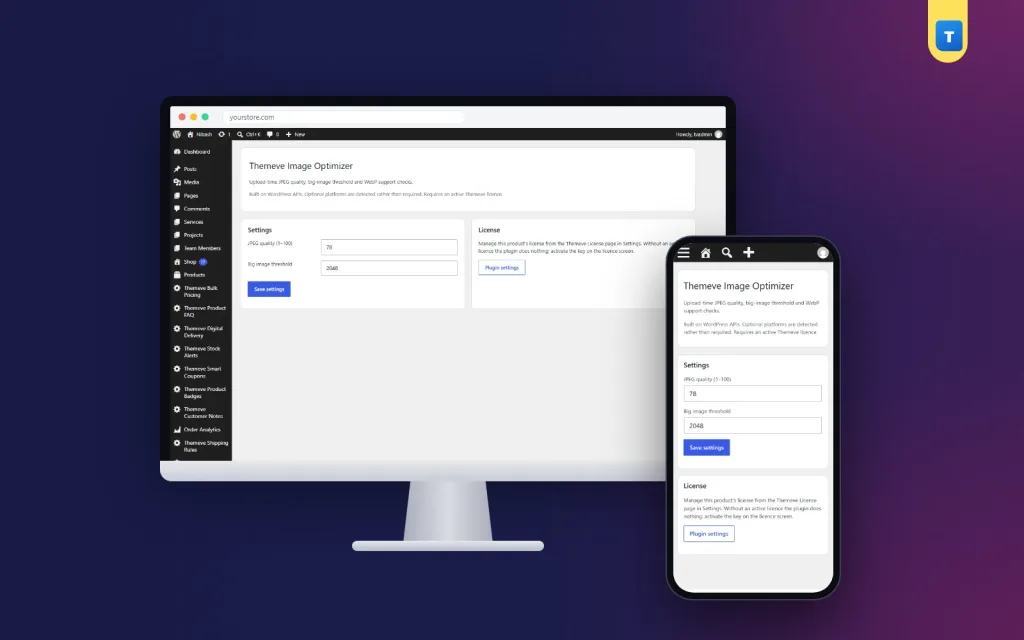
If you want a small tool that covers the basics, Image Optimizer is one option. It is a simple plugin that works on your own server, with no outside service.
It gives you three things on one settings screen:
- The JPEG quality used when WordPress creates image sizes.
- The big image threshold, so huge uploads are scaled down automatically.
- A WebP server support check, so you know what your hosting can do.
It works on every new upload, with any WordPress theme, and photos never leave your server. It does not need WooCommerce or another plugin. It is a lean choice for shops, blogs and portfolio sites that want control without a crowded dashboard. Whether it is the best image optimizer WordPress plugin for you depends on the checklist below, so measure first and decide after.
It is not a magic button. It applies to new uploads, and it will not fix a slow host or a theme with heavy scripts. You can read the full details on the Image Optimizer product page.
Plugin or manual resizing: which is better?
Some people prefer to resize every photo by hand before upload. That works well for a single owner who adds a few pictures a week. It breaks down when several people upload, or when someone is in a hurry.
A plugin sets one rule for everyone. Nobody has to remember anything, and the rule applies the same way on the first day and the five-hundredth. The best approach is often both: ask your team to crop sensibly, and let the plugin catch whatever slips through.
Think about who uploads to your site today:
- One owner who edits every photo: manual resizing may be enough.
- A small team with a shared login: set automatic rules.
- Outside photographers or suppliers sending files: set automatic rules and a strict size threshold.
- A news or blog site with daily posts: automatic rules save the most time.
Either way, write the rule down. A short note in your team chat, such as "crop first, name the file, then upload", does more than a long manual nobody reads.
How to test the result
After you change settings, test again with the same method you used at the start.
- Upload three test photos: one product photo, one wide banner and one portrait.
- Open each on your phone and your laptop. Look for blur, banding or odd colours.
- Check the file size in the media library or the Network tab.
- Compare page load time with your first measurement.
- Repeat the test after one week, with real content, to confirm the gain holds.
If quality looks poor, raise the JPEG number a few points. If pages are still heavy, lower the threshold or check your largest banners.
Common mistakes to avoid
- Setting quality too low. Blurry photos hurt trust more than a one-second delay.
- Ignoring old uploads. Settings often apply to new files. Replace the biggest older images by hand.
- Installing several image plugins. They can conflict. Use one.
- Judging on a fast connection. Always test on mobile data.
- Forgetting backups. Keep your originals somewhere safe before bulk changes.
- Chasing a perfect score. A speed test number is a guide, not a goal.
A simple checklist for choosing the best image optimizer WordPress plugin
- Measure image weight on two key pages.
- Pick a JPEG quality and test it on a phone.
- Set the big image threshold to match your widest layout.
- Check whether your server supports WebP.
- Choose one image plugin, not three.
- Ask your team to crop and name files before upload.
- Replace the heaviest old images.
- Test again after a week.
Work through the list once, and you will have done more than most sites ever do for their images. When you compare tools, ask each one the same questions, so the best image optimizer WordPress plugin for your site becomes clear from the answers and not from the marketing.
If you want to read more on the technical side, the official WordPress documentation is a good, reliable reference.
Frequently asked questions
What is the best image optimizer WordPress plugin for a small site?
The best choice is the one that matches your needs. A small site usually does well with a light plugin that sets quality and size automatically, keeps files on your server and has a short settings screen. Avoid paying for features you will not use.
Will an image optimizer make my photos look worse?
Not if you choose sensible settings. A moderate JPEG quality looks the same to most visitors. Test on a phone and a laptop, and raise the quality if you see blur.
Do I need WebP?
No. WebP can give smaller files, but it depends on your server. Good quality and size settings already make a large difference, so check WebP support first and decide after.
Does a plugin fix photos I uploaded last year?
Usually settings apply to new uploads. For old files, find the heaviest ones in your media library and replace them with lighter versions.
Is it safe to send my photos to an outside service?
Many people are fine with it. If your photos are private, such as client work or unreleased products, a plugin that works on your own server is the safer choice.
How do I choose the best image optimizer WordPress plugin for a shop?
Look for automatic handling on upload, a clear quality setting, control over the maximum image size and no dependence on your theme. Then test on a mobile connection before you decide.
Will faster images improve my search position?
Nobody can promise that. Faster pages give visitors a better experience, and that is a good reason to optimise images on its own.